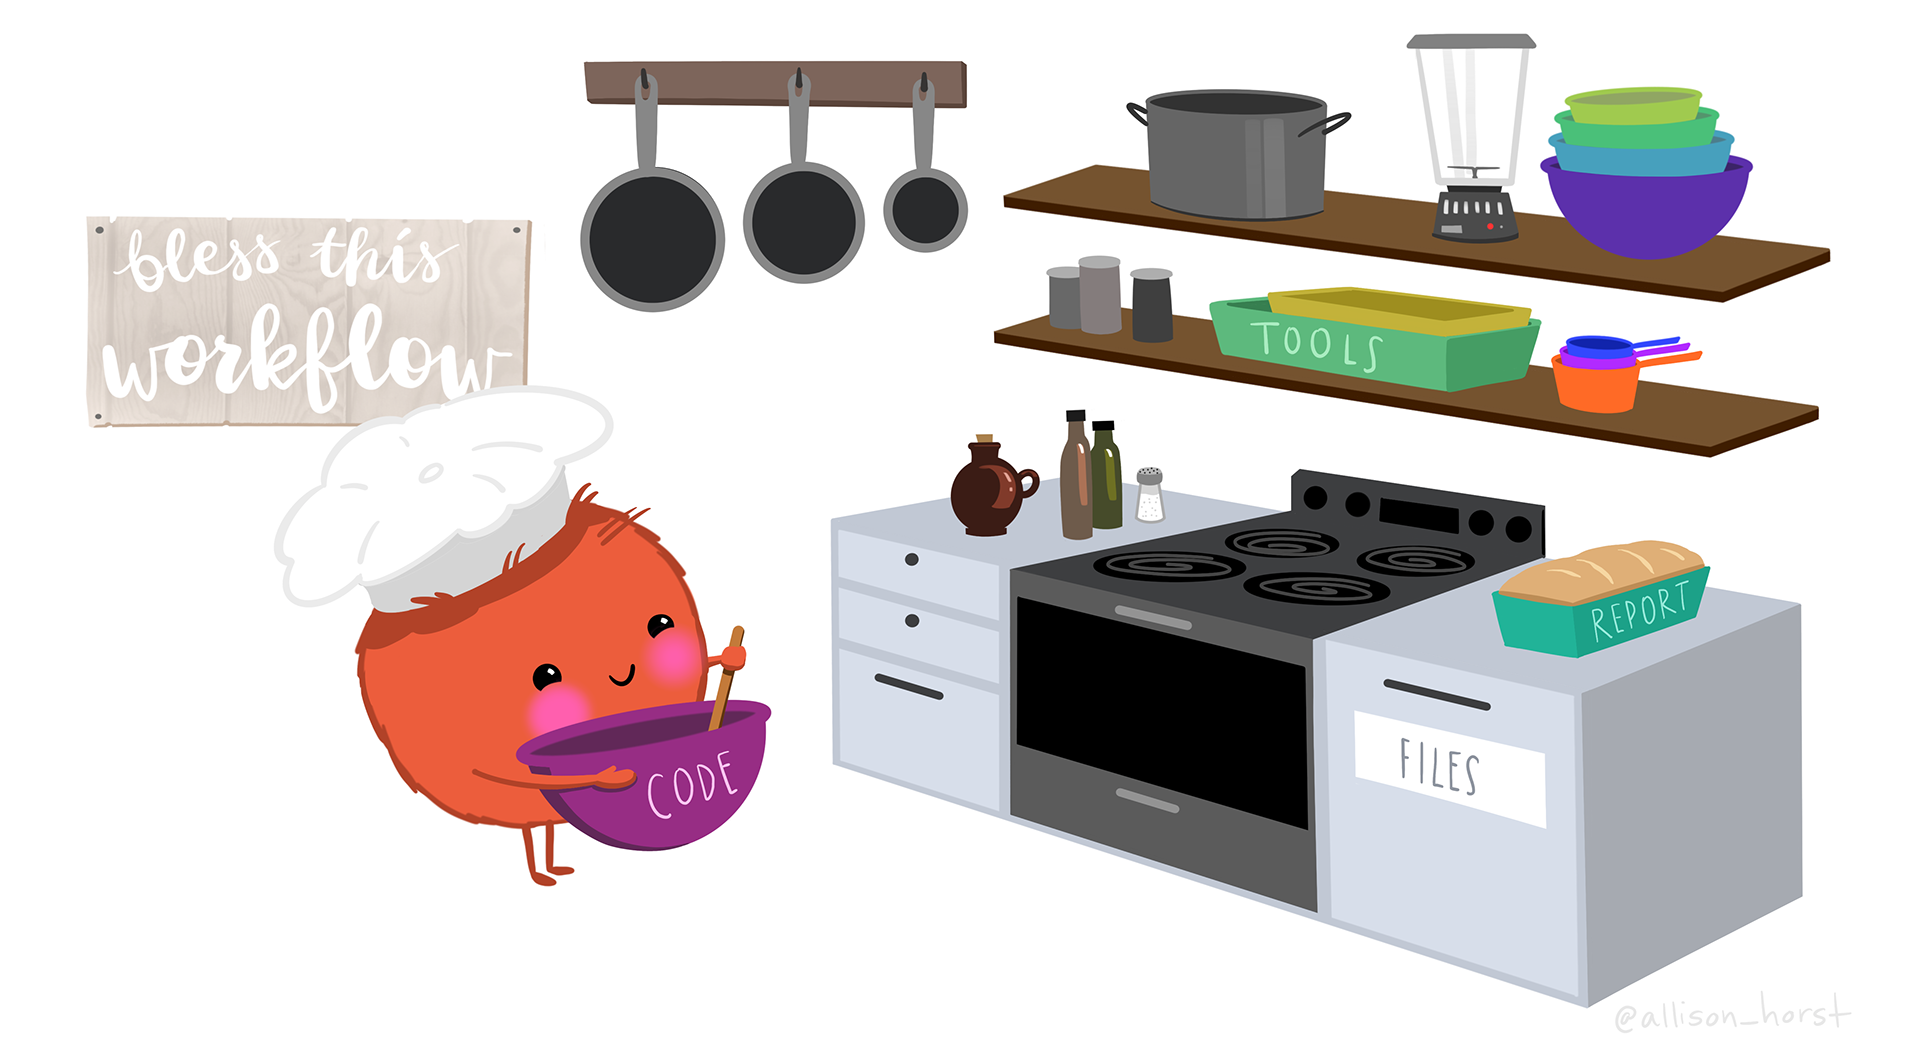
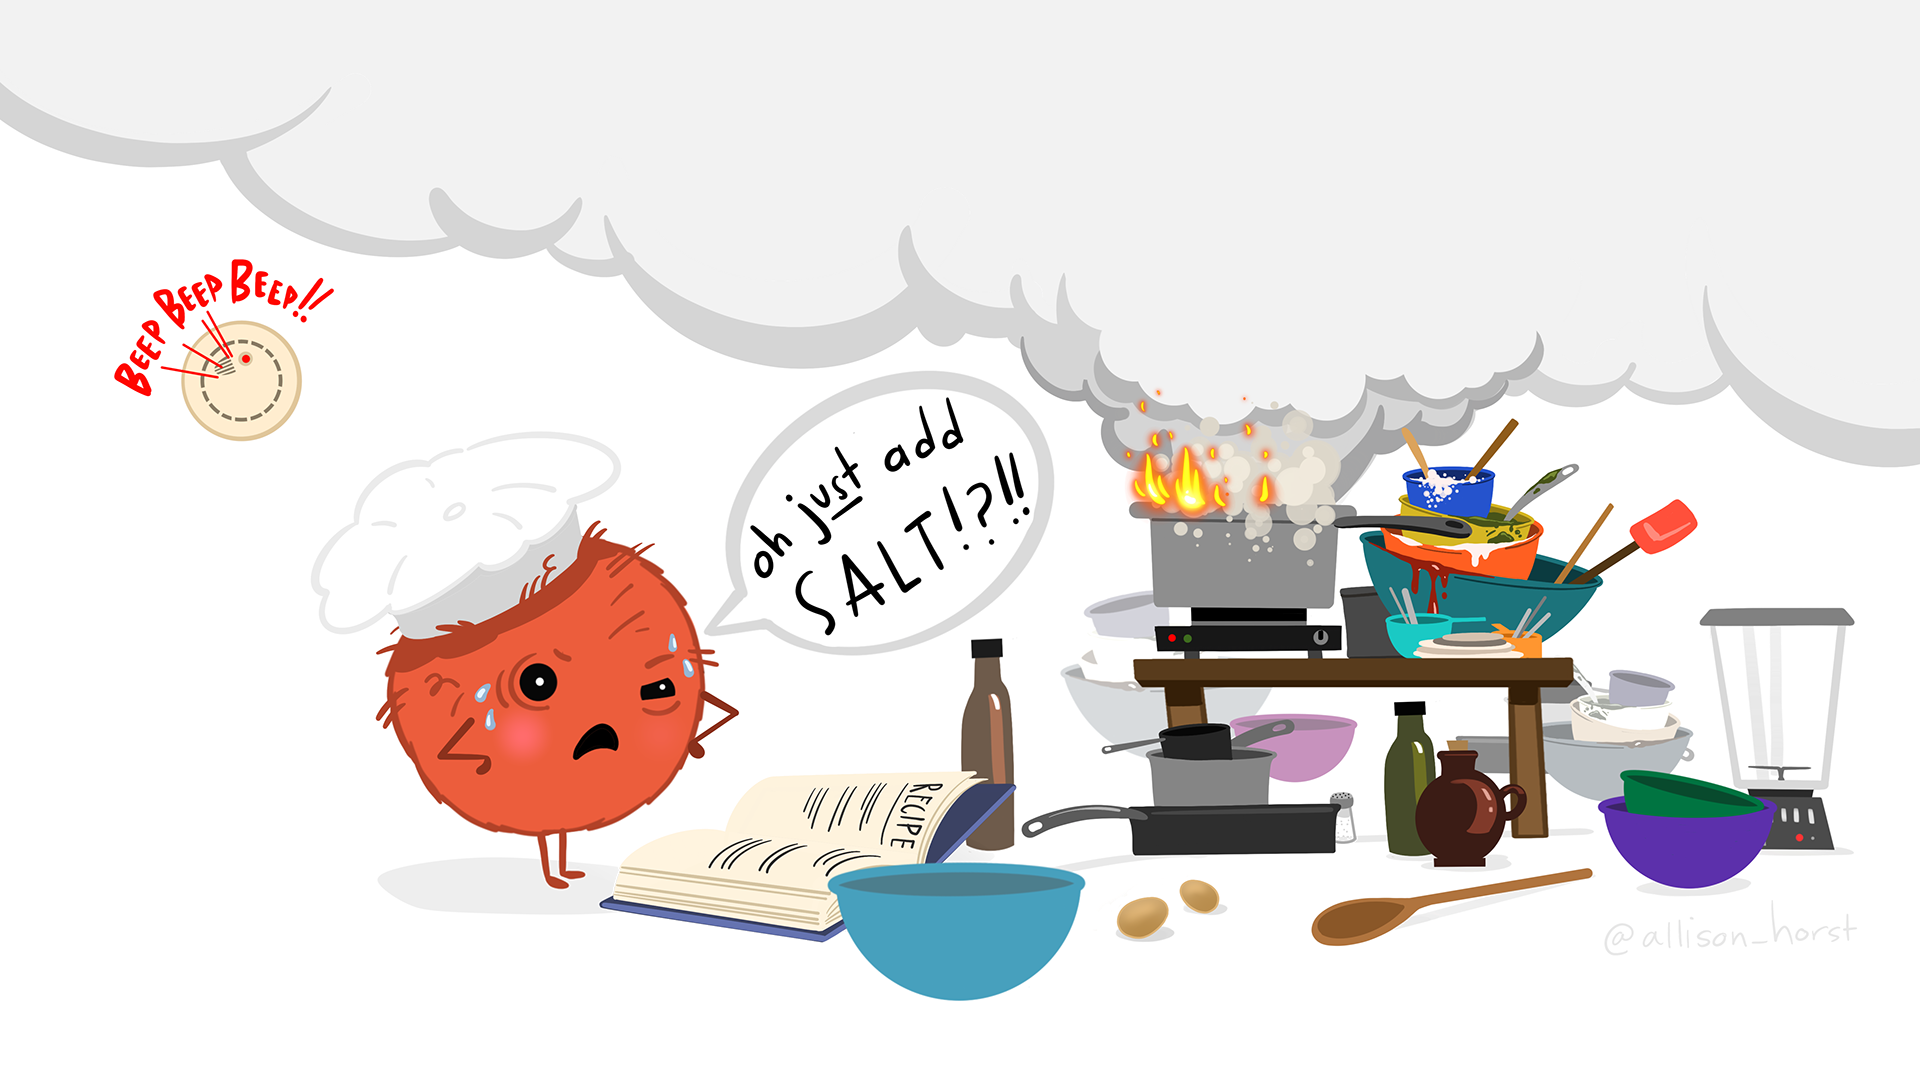
Content from Before we start
Last updated on 2026-03-31 | Edit this page
Overview
Questions
- Where can I meet other workshop participants?
- Where can I fill in my questions about the workshop topic?
- Where can I find the Code of Conduct?
- How can I report unacceptable behaviour?
Objectives
- Share our communication forum.
- Share our Code of Conduct.
Roll call
Checklist
Hello!
Before we start, tell us something about you on our communication forum called GitHub Discussions.
Welcome
Checklist
A reminder of our Code of conduct:
If you experience or witness unacceptable behaviour or have any other concerns, please report by completing this short form: https://forms.gle/guKqVXPk6K43jPn59
To report an issue involving one of the organisers, please use the LSHTM’s Report and Support tool, where your concern will be triaged by a member of LSHTM’s Equity and Diversity Team.
Contributors
This material has contributions from:
- James Azam, PhD, RSE at Epiverse.
- Carmen Tamayo-Cuartero, PhD, RF at Epiverse.
Key Points
- Use the
GitHub Discussionsas our communication forum for the workshop. - Use the Code of Conduct to report unacceptable behaviour.
Content from Introduction
Last updated on 2026-03-31 | Edit this page
Overview
Questions
- Why to improve our code for analysis?
- What can we do to improve it?
- How can we start improving it?
Objectives
- Explain our vision of an improved epidemic analysis code.
- Share our strategy to incorporate good practices in scientific computing.
- Define our plan to incorporate practical and quick-to-learn solutions.
Why improve our code for epidemic analysis?
When we want to improve our analysis code’s reliability and reusability, we want to make it reproducible.
Reproducible research aims to ensure that anyone with access to data inputs and software can feasibly generate the data outputs, both to check or build on them. Reproducibility is improved when mixed with Open science and Sustainable software features.
Our vision for this workshop is to increase the awareness of good practices that will increase the reproducibility of data analysis workflow that already uses R and Git.

The figure above helps us to visualize and potentially evaluate the processes we are following. A process-centred approach helps us remove the focus on human error, be aware that processes can fail people with good intentions, and accept that we can enter a continuous improvement cycle.
“By defining the process, we can begin to borrow from the rich field of operations, which focuses primarily on (the) process. One paradigm that proves especially useful is the concept of human error. The seminal book The Field Guide to Understanding Human Error argues for a paradigm shift from the “Old World View” (that when an error occurs it is an individual actor’s fault) to the “New World View” (that when an error occurs, it is a symptom of a flawed system that failed that individual actor) (Dekker 2014). When an error in an analysis occurs, it is safe to assume (aside from nefarious actors) that the analyst did not want that error to occur. Given that she thought she was producing an analysis free from errors, you must look at the way she developed the analysis to understand where the error occurred, and create safeguards so that the error does not occur again.” (Parker, 2017a and Parker, 2017b)
Repetitive events (like outbreak response and research data analysis projects) give us the opportunity to:
- Focus on the process we have followed,
- Evaluate where bottlenecks occur, and then
- Adopt new practices to be better protected against errors in the next iteration.
Deming Cycle
This approach aims to follow a Deming cycle of Plan, Do, Check, and Act, as a foundation for continuous improvement.
Discussion
Exercise: Your experience analyzing outbreak data (the latest… or the most chaotic!)
Take 5 minutes.
Reflect on these questions:
- How do you organize your files and folders?
- Where do you describe what your project does or how to use it? Was it all in one accessible place?
- Could your project be reused by colleagues? Do you think it is?
Share one idea from your neighbour.
What can we do?
A fair strategy to follow is to gradually incorporate good practices in scientific computing (Wilson et al. 2017) that include:
- Data management,
- Software development,
- Collaboration,
- Project organization,
- Keep track of changes, and
- Manuscript writing.
Do I need to use them all from today?
No, we do not intend you start adopting all these workshop’s good practices and tools.
If you already use a programming language like R and Git for version control, you are already on the path!
We support the opinion of Jaime Quinn: “It can be challenging to absorb so many different good practices while still getting research done. However, I would argue that anything helps. While all good practices in open science are important, even just incorporating one example is good for the community and provides a solid personal foundation for gradually incorporating more good practices.”
How can we start?
Our plan for this workshop is to prioritize three tools, given their usefulness once mastered and the time to master them:
- Use research compendium templates.
- Make reproducible analysis.
- Write informative READMEs.
We’ll relate relevant features for Sustainable software, Reproducible research, and Open science for each tool.
Key Points
- Our vision is to increase the awareness of tools to improve the reproducibility of data analysis.
- Our strategy is to incorporate good practices in scientific computing gradually.
- We plan to share specific tools to create a research compendium, make a reproducible analysis, and write READMEs.
Content from Research compendium
Last updated on 2026-03-31 | Edit this page
Overview
Questions
- How do you create a research compendium for an R project?
- How do I facilitate users and collaborators to participate in my project?
- What features are related to sustainable software?
Objectives
- Adapt a research compendium template with files and folders organized logically with rcompendium.
- Add community files for users to seek support and contribute with usethis
- Identify your project features related to sustainable software.
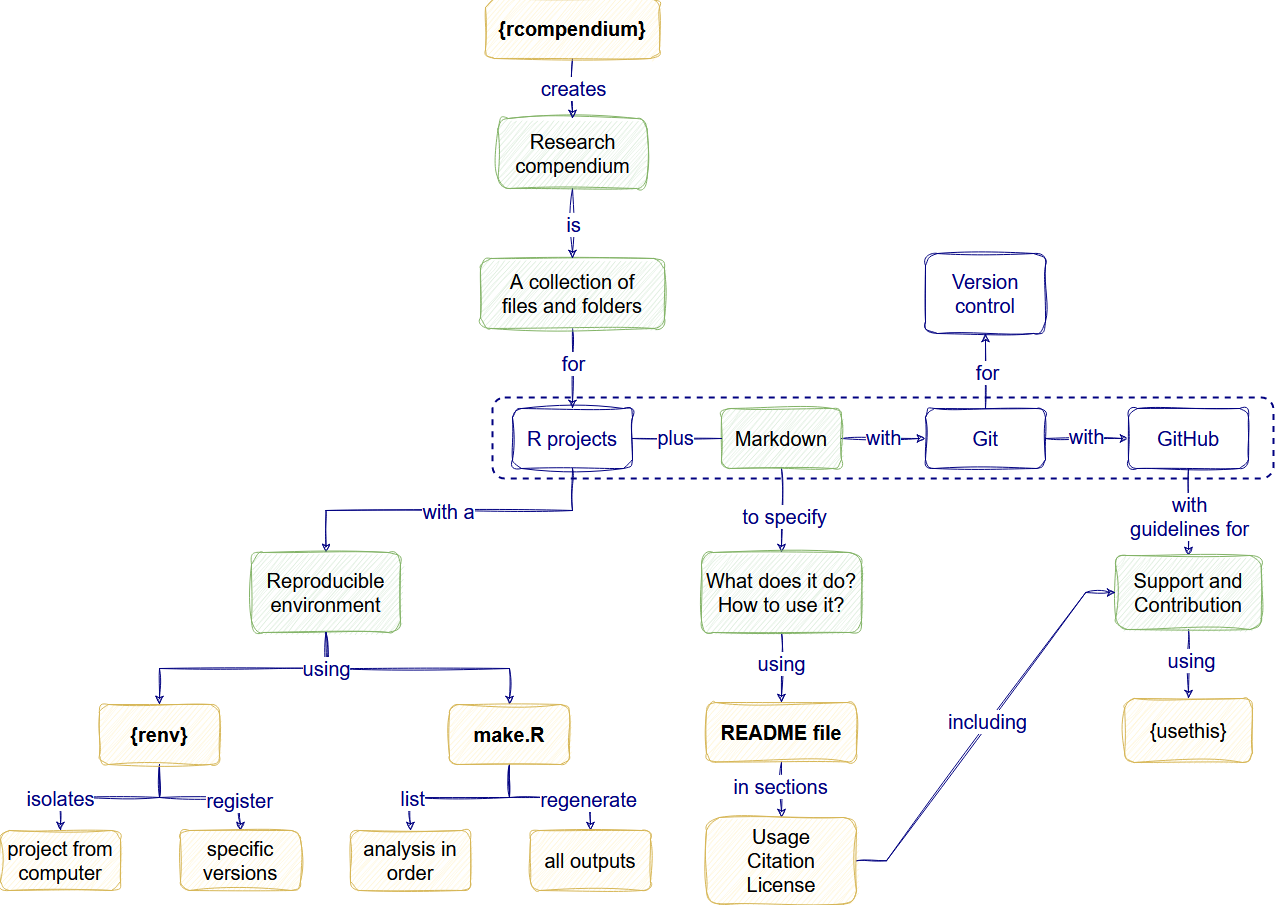
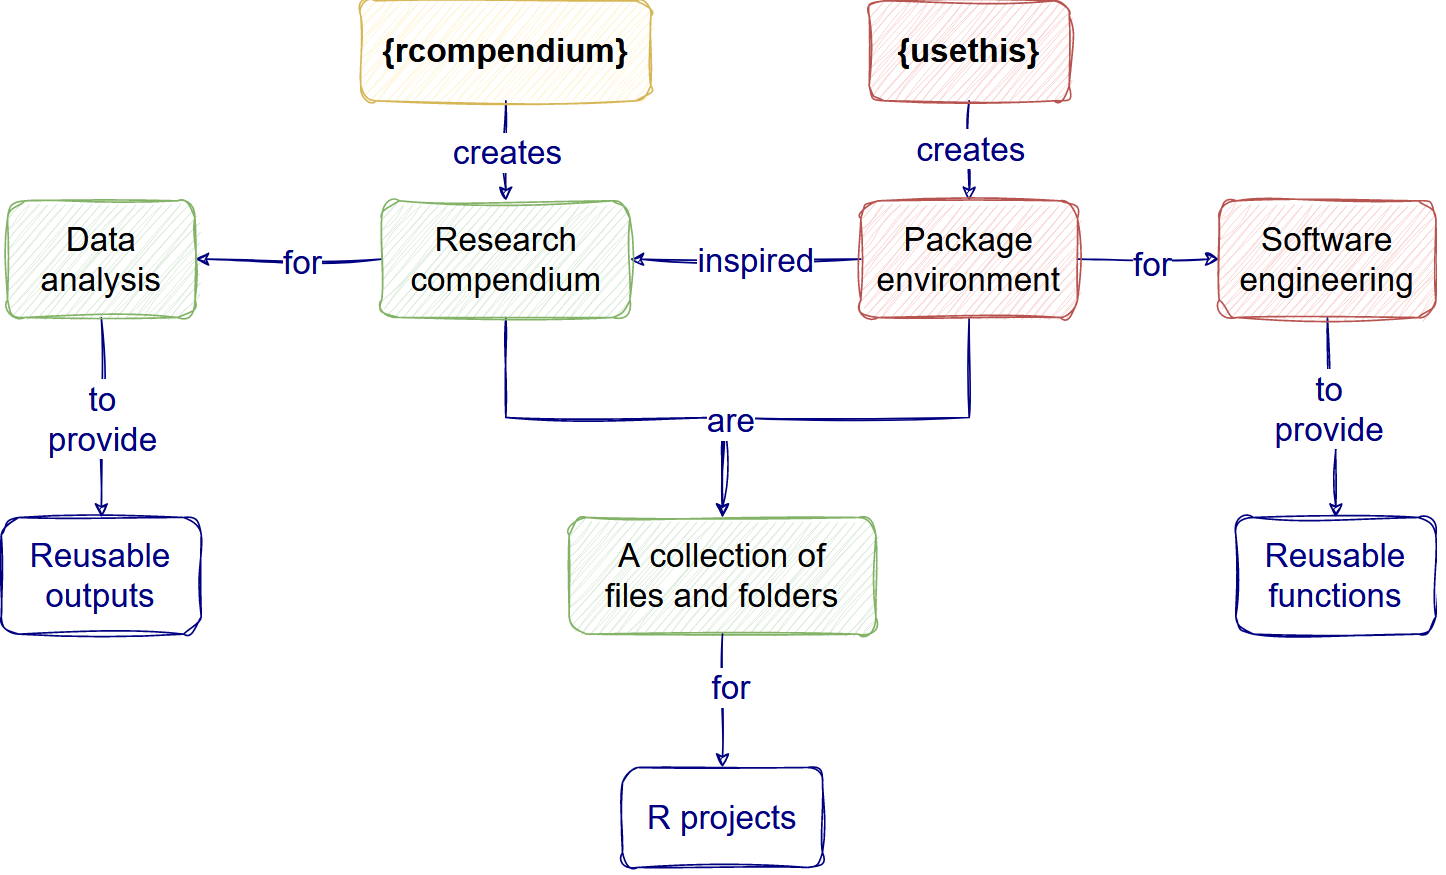
What is a research compendium?
A research compendium collects all digital parts of a research project, including data, code, and texts (protocols, reports, questionnaires, metadata). We create this collection in such a way that reproducing all results is straightforward (The Turing Way Community, 2022)
Using templates facilitates having all the required files from the beginning of your project.
We understand that creativity can be “messy” sometimes. You will be able to handle it in the present, but your collaborators (and the future you) may have problems understanding it. Reproducibility is as much about the humans that interact with the code as the machines that need to run it (Campitelli and Corrales, 2022).
Let’s code
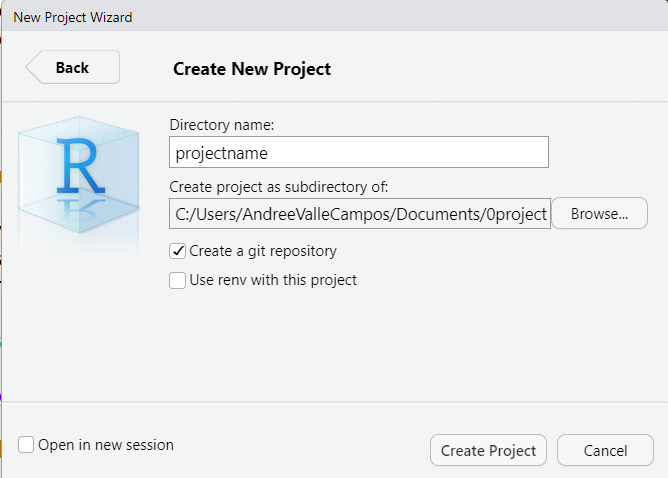
Create a Rstudio Project
Go to Project, which is in the top right corner of
Rstudio and select New Project.... Follow these steps:
- Select
New directory, - Select
New project, and - Check the
[x] Create a git repositoryoption
Stop! Find a name!
Don’t use projectname as your R project name!
Create a new one, thinking about your current research project.
Your projectname must follow some rules for everything
to work. It must:
- contain only ASCII letters, numbers, and dots “
.” (it cannot have a hyphen “-”) - have at least two characters
- start with a letter (not a number)
- not end with a dot “
.”
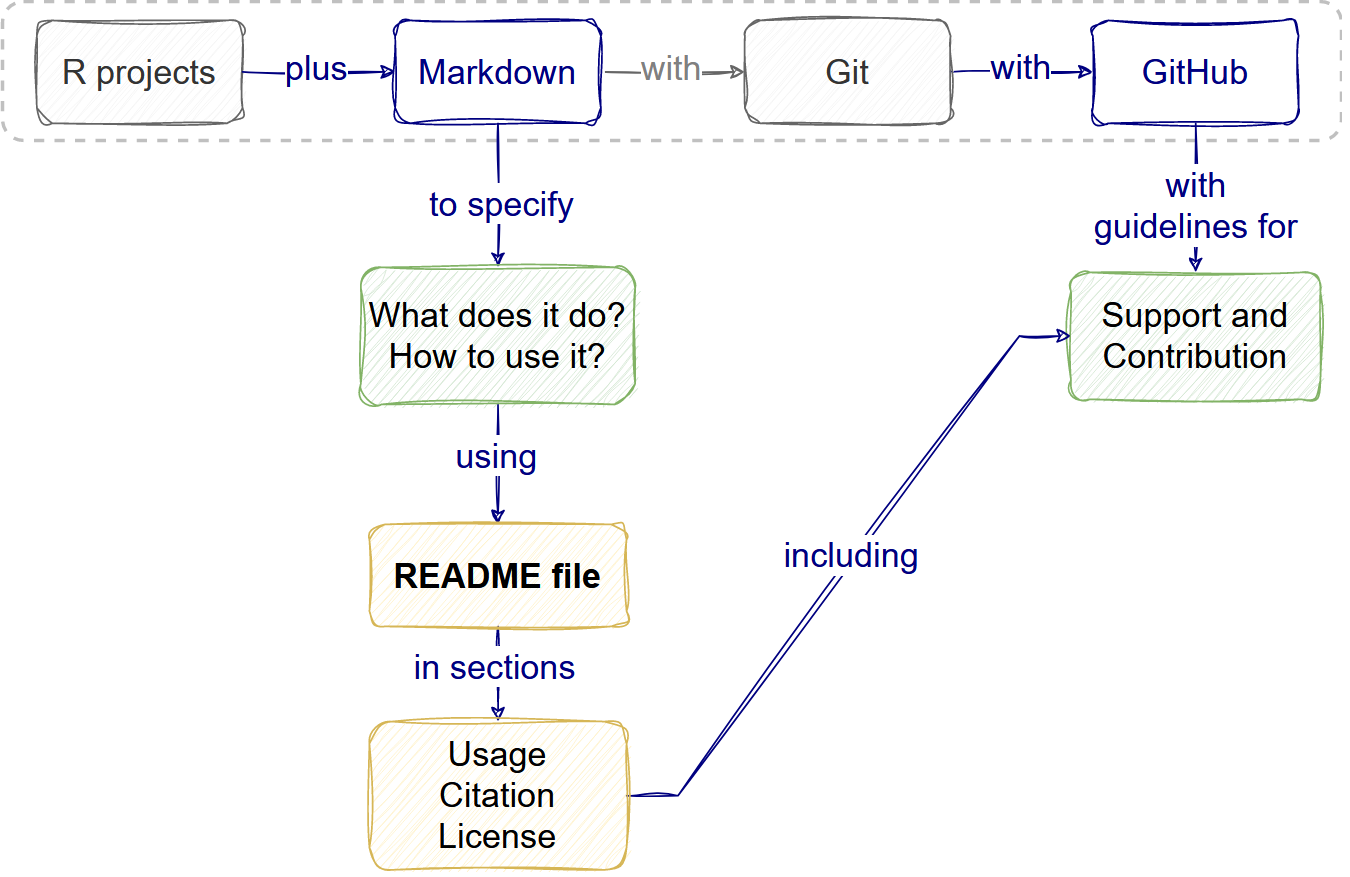
Create a research compendium
To create a new research compendium run:
R
rcompendium::new_compendium()
This function will create new files and folders as a template. You can rearrange the folder elements by size to identify its components.
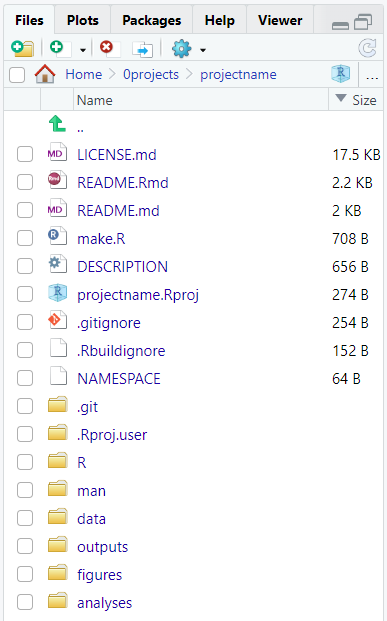
We will explore the content of each new element during the workshop.
This function will also create the GitHub repository for your project. This step will open a new tab in your browser.
Add community files
We are going to add more files to the default template. For this, we
are going to use a package with helper functions called {usethis}.
To add community files, run:
R
usethis::use_tidy_github()
This function is a convenience wrapper function
that adds four template files in a new folder called
.github/:
-
SUPPORT.mdwith resources to seek support. -
CONTRIBUTING.mdwith contributing guidelines. -
issue_template.mdwith steps on how to report issues. -
CODE_OF_CONDUCT.mdwith guidelines to foster an environment of inclusiveness and to explicitly discourage inappropriate behaviour.
These four files follow the tidyverse standards. You can edit them writing
with Markdown to fit your specific project content
purposes.
Prerequisite
Now commit and push your changes using
git.
Git reminders
We use
git committo capture a snapshot of the project’s currently staged changes. We usegit addto ‘stage’ changes that we will store in a commit.We use
git pushto uploadlocalrepository content to aremoterepository.
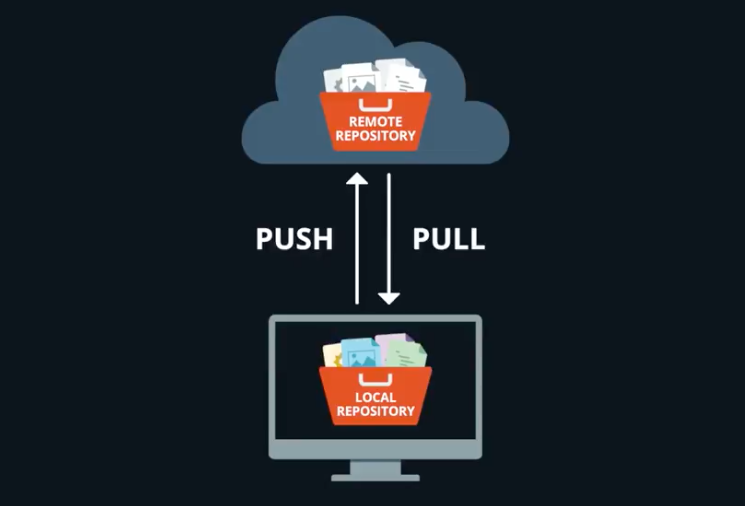
- You can use Git with Rstudio to performs these tasks.
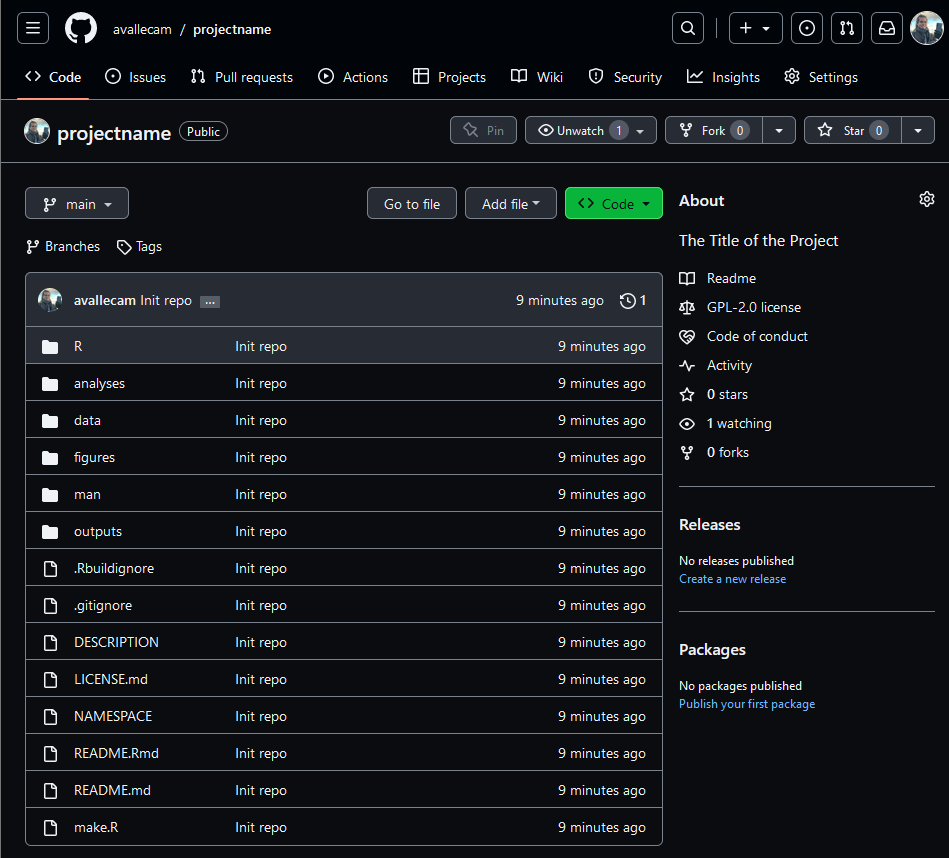
Where are community files visible?
GitHub automatically recognizes these files and adds them as hyperlinks in specific places.
- Go to the About section in the upper right corner
side of your repository, to read the
Code of conduct:

- Go to the Issues tab on the navigation bar at the
top of your repository on GitHub. You will find a link to the
issue templatesyou added there.
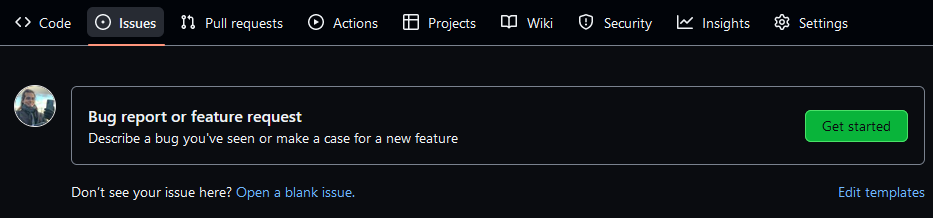
- Press the
"Get started"button on the right to write on top of the template. In the lower right corner, the Contributing and Support files are accessible under the Helpful resources subtitle.
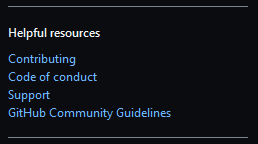
These community files are also known as community health files
Discussion
Do you find the links to the Community files visible enough on GitHub?
Have you ever found them in a different place in the past?
Checklist
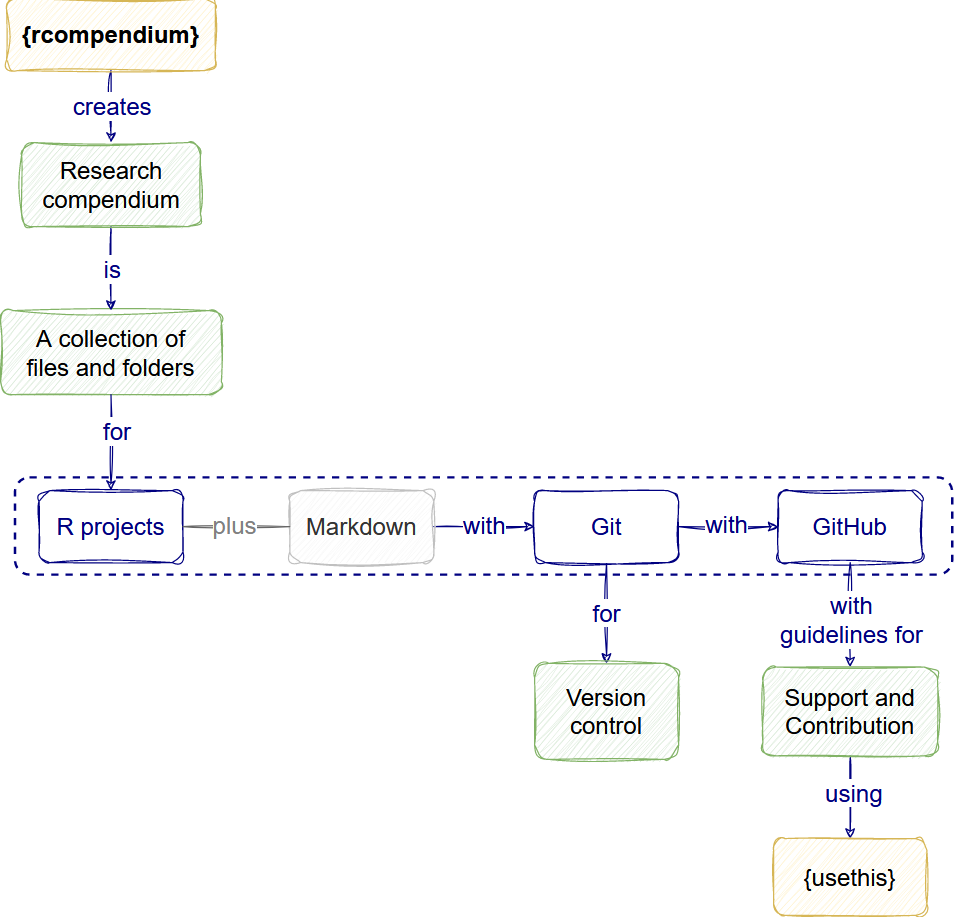
Sustainable software features
Software is sustainable when it’s easier to maintain and extend rather than replace. This easiness depends on the:
- Quality of the software,
- Skills of the potential maintainers, and
- How much the user community is willing to invest to keep the software up to date.
Features like a Research compendium template and Version control increase the quality of the software.
- A Research compendium follows Project organization good practices. This give a logical and familiar structure to the project.
- A version control follows the Keep track of changes good practice. This registers the project’s history and how one or multiple contributors wrote code and made decisions.
Additionally, Community files follow Collaboration good practices. They consider any gaps in the community of users to facilitate their participation and how to interact with maintainers.
Testimonial
Is a data analysis also considered a piece of software?
Nick Huber, from the blog Towards Data Science, concludes that data analysis best practices/tools are starting to strongly resemble practices/tools from software engineering
The repository of this lesson also came from a template that looks like a derivative of a research compendium, which also looks like a piece of software like an R package.
Key Points
- Use rcompendium templates to reuse all the files and folders a research project needs.
- Use usethis to add complementary community files to a research project.
- Version control, Research compendium, and Community files are features related to Sustainable software.
Content from Reproducible analysis
Last updated on 2026-03-31 | Edit this page
Overview
Questions
- How do I make my research project reproducible?
- How do I include packages as dependencies of my project?
- What features are related to reproducible research?
Objectives
- Add dependencies of a project using the
DESCRIPTIONfile. - Create an isolated and specific reproducible environment with renv
- Identify your project features related to reproducible software.
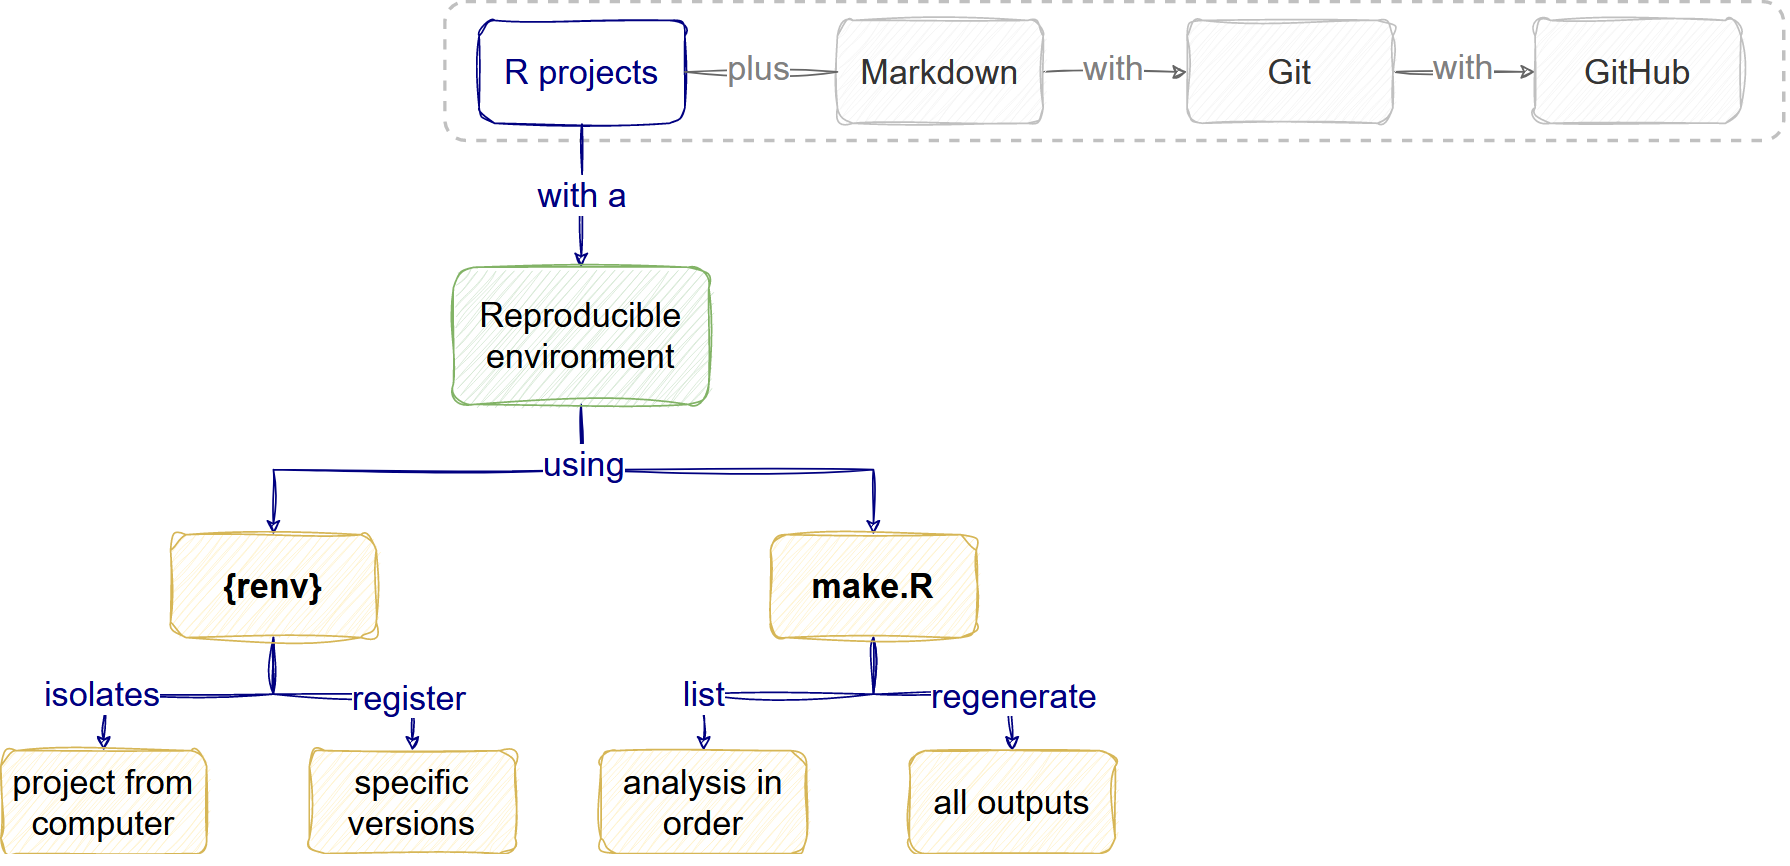
How do I make my analysis reproducible?
The reproducible environment
Any analysis with R needs packages. These packages on which your
project relies are called dependencies.
To make an analysis reproducible, we need to register these packages
(and their versions) somewhere as your project’s dependencies. That
place is the DESCRIPTION file.
In the DESCRIPTION
file, dependencies are registered at the end of the file with the
package names only and usually with a minimum version
(dplyr (>= 1.0.0)). We can add dependencies using
functions (rcompendium::add_dependencies()), and also use
this file to automate version recovery
(devtools::install_deps()). However,
DESCRIPTION files are most useful for R packages.
For non-package
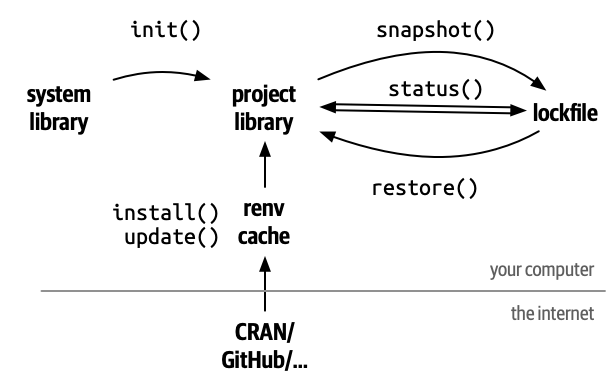
projects we can use renv. It registers specific
dependencies by implementing project-specific environments, which means
that renv registers even the SHA/hash
from GitHub packages, feature that the DESCRIPTION file can
not do. Also, renv isolates your project packages from
your computer packages. Lastly, renv can detect new
dependencies automatically, apart from adding them with functions
(renv::snapshot()), and it can also automate the recovery
of the whole project (renv::restore()).
Callout
The renv package:
- Isolates the dependencies of your project from your computer.
- Registers the specific version of packages from CRAN or GitHub.
- Provides an automated package management solution to restore an external project.
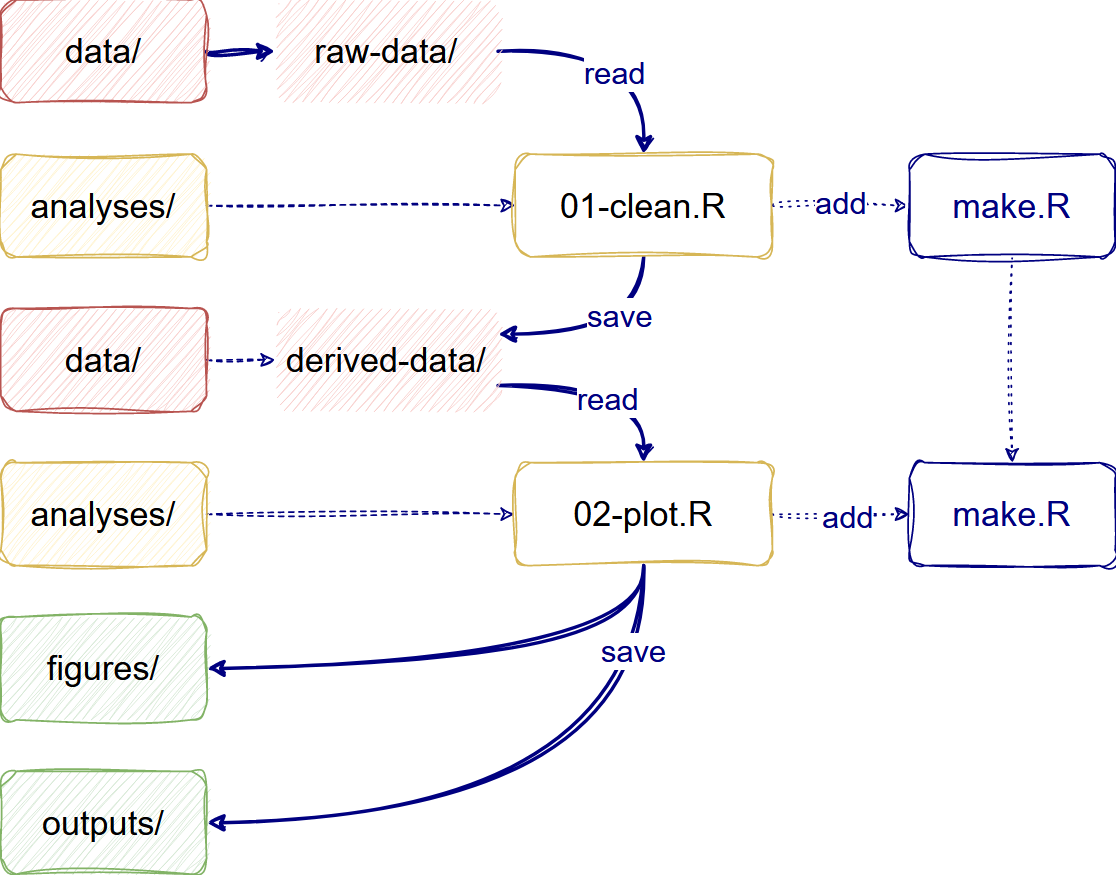
The analysis workflow
Complementary to the dependencies, your analysis workflow must follow some good practices in scientific computing.
First, for Data management, we need to save input
data as originally created and, preferably, configure it as a read-only
file. In your project, you can differentiate raw-data from
derived-data
Second, for Project organization, we need to store
analysis and generated files in specific and isolated folders. In your
project, you can differentiate analyses files (like
.R scripts and .Rmd files) from
figures and other outputs.
Automate your analysis
The make.R file helps automate your analysis project.
This file includes a script line to automatically restore your
dependencies (renv::restore()) and run all the analysis
scripts in your preferred order. The make.R file is the
only .R file stored in the project’s root given by the
rcompendium template. You can use the make.R
file as the only script to run and regenerate all your project
outputs.
Callout
The make.R file is inspired but not equivalent to GNU
Make file.
GNU
Make files can identify out-of-date files and
re-execute any downstream code that needs to be updated, usually used
for bash
scripts.
To use this functionality for your R project, you can
use the {targets}
package.
Let’s code
We need to play under the rules of the rcompendium template.
The reproducible environment
We will use renv instead of DESCRIPTION
files for this.
Usually, to initiate a
reproducible environment with renv, we need to run
renv::init().
However, when working in a rcompendium template, your first step must be to run:
R
rcompendium::add_renv()
OUTPUT
This project contains a DESCRIPTION file.
Which files should renv use for dependency discovery in this project?

1: Use only the DESCRIPTION file. (explicit mode)
2: Use all files in this project. (implicit mode)
Write 2 and press ENTER to use renv
instead of DESCRIPTION file.
Question
Why not to use renv in addition to
DESCRIPTION?
We can use renv in addition to
DESCRIPTION.
However, we opt to use renv instead of
DESCRIPTION because the
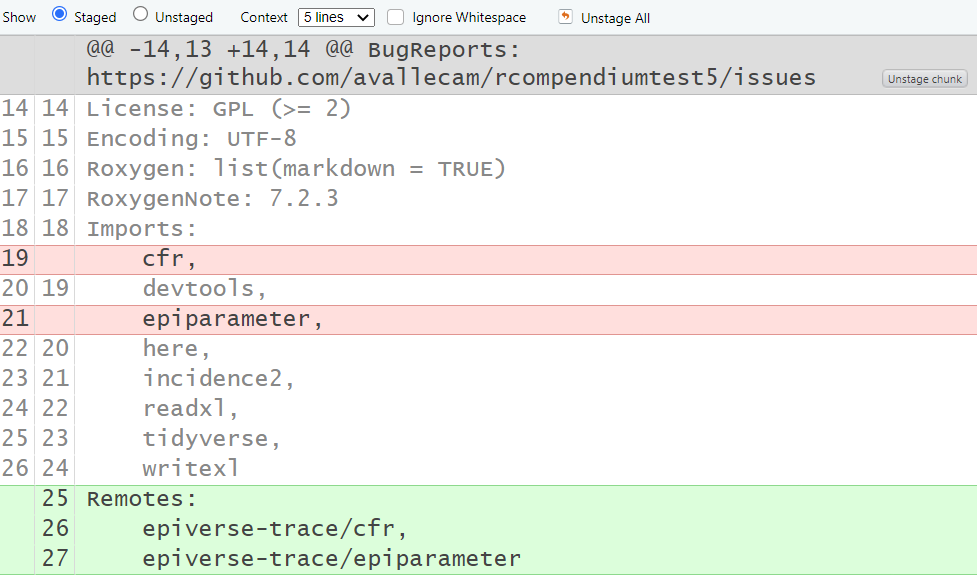
rcompendium::add_dependencies(".") function because it
assumes that all packages to add to DESCRIPTION are from
CRAN. If you want to add GitHub packages, you need to
add them manually in a different section called
Remotes: and write repository/package. The
renv package solves this automatically.
However, this still needs to be assessed with different scenarios to confirm this as the final best decision.
If you decide to use renv in addition to
DESCRIPTION run:
R
rcompendium::add_dependencies(".")
Note that this function requires one argument specification
".", which means that your working
directory must be at the root of the R project.
The output below details which packages were included in the description file
✔ Scanning 'Imports' dependencies
  (*) Found 2 package(s)
  (*) Adding the following line in 'DESCRIPTION': `Imports: devtools, here`
If you get an error message like:
ERROR
Error in renv_snapshot_validate_report(valid, prompt, force) :
  aborting snapshot due to pre-flight validation failure
Run again the rcompendium::add_renv() function. You may
get the following message:
OUTPUT
This project already has a private library. What would you like to do?

1: Activate the project and use the existing library.
2: Re-initialize the project with a new library.
3: Abort project initialization.
Write option 1 and press ENTER.
This step creates a renv/ folder and modifies the
content of the make.R in line 15, replacing
the default devtools::install_deps() by
renv::restore.
Second, to get the status of the project run:
R
renv::status()
OUTPUT
This project does not contain a lockfile.
Use renv::snapshot() to create a lockfile.
Callout
Always follow the suggestions of the renv::status()
output. You can also get a message from it each time you reopen your
project.
Third, to create the lockfile run:
R
renv::snapshot()
This step creates a renv.lock file detailing the
following:
- R version on top and
- specific version details of all the packages in the project’s dependency tree (including SHA/hash for GitHub packages).
{
  "R": {
    "Version": "4.2.2",
    "Repositories": [
      {
        "Name": "CRAN",
        "URL": "https://packagemanager.posit.co/cran/latest"
      }
    ]
  },
  "Packages": {
    "R6": {
      "Package": "R6",
      "Version": "2.5.1",
      "Source": "Repository",
      "Repository": "RSPM",
      "Requirements": [
        "R"
      ],
      "Hash": "470851b6d5d0ac559e9d01bb352b4021"
    },
    ...
Now, you have completed your reproducible environment configuration.
The analysis workflow
The workflow will follow these three paths:
- Read
raw-data/toclean.Rit and save it toderived-data/. - Read
derived-data/to make aplot.Rand save it tofigures/. - Read
derived-data/to make atable.Rand save it tooutputs/.
First, download the sample data set.
Since this is raw data, save it in the data/raw-data/
folder.
Second, create the analysis script to clean this raw data set. Name
it 01-clean.R. Save it in the analyses/
folder. Copy and paste these lines of code:
R
# Load packages
library(readxl)
library(tidyverse)

# Read raw data
dat_path <- "https://github.com/reconhub/learn/raw/master/static/data/linelist_20140701.xlsx"
dat <- rio::import(file = dat_path) %>%
  tibble::as_tibble()

# Clean raw data
dat_clean <- dat %>%
  dplyr::select(case_id, date_of_onset, date_of_outcome, outcome) %>%
  dplyr::mutate(dplyr::across(
    .cols = c(date_of_onset, date_of_outcome),
    .fns = as.Date
  )) %>%
  dplyr::mutate(
    outcome = fct(outcome, level = c("Death", "Recover"), na = "NA")
  )

# Write clean data
dat_clean %>%
  readr::write_rds("outputs/linelist_clean.rds")
Notice that we are writing a new cleaned data set in a different
path: data/derived-data/.
Callout
The default folder to save R scripts will be
R/. This path is the place to write your Modular functions. Go to theanalyses/folder to save your analysis script.Yes, it is named
analyses/not “analysis”.
Rstudio will invite you to install new packages. Press Install.
Always run renv::status() after installing new
packages:
R
renv::status()
OUTPUT
The following package(s) are in an inconsistent state:

 package       installed recorded used
 backports     y         n        y
 bit           y         n        y
In this case, we need to follow the instructions in the section of Missing
packages from the ?renv::status() documentation.
R
renv::install()
OUTPUT
- There are no packages to install.
- Automatic snapshot has updated '~/0projects/projectname/renv.lock'.
Third, create an analysis script to create an incidence plot for
this cleaned data set. Name it 02-plot.R. Save it in the
analyses/ folder. Copy and paste these lines of code:
R
# Load packages
library(tidyverse)
library(incidence2)

# Read data
ebola_dat <- readr::read_rds("outputs/linelist_clean.rds")

# Create incidence2 object
ebola_onset <-
  incidence2::incidence(
    x = ebola_dat,
    date_index = c("date_of_onset"),
    interval = "epiweek"
  )

# Read incidence2 object
ebola_onset

# Plot incidence data
plot(ebola_onset)

# Write ggplot as figure
ggsave("figures/02-plot_incidence.png", height = 3, width = 5)
Notice that we are writing the new plot in a different path:
figures/.
Challenge
- Explore the
i2extras::fit_curve()to fit a model to the incidence curve. - Save the output table in the corresponding folder.
- You can reuse the
incidence2object as input in the same file. - Remember to update the renv status if you need to install and use a new package for this task
Automate your analysis
The easiest step to forget!
Lastly, list all .R scripts and .Rmd in a
sequential order in the make.R file after
line 32:
R
## Run Project ----

# List all R scripts in a sequential order and using the following form:
# source(here::here("analyses", "script_X.R"))

source(here::here("analyses", "01-clean.R"))
source(here::here("analyses", "02-plot.R"))
Checklist
Challenge
Restore the analysis of a colleague
Get the link to a GitHub repository and try to restore their
reproducible environment using renv::restore(). Does it
work?
If you are working alone, try restoring this repository: https://github.com/epiverse-trace/epiverse_demos/
We notice that renv::restore() compares packages
recorded in the lockfile (renv.lock) to the packages
installed in the project library. If they differ, this will trigger a
package update. For example, in the output below, the computer has
bslib version 0.7.0, but the lockfile has
0.4.0, so the update goes in the direction to return to the
previous version.
R
renv::restore()
OUTPUT
It looks like you've called renv::restore() in a project that hasn't been activated yet.
How would you like to proceed?

1: Activate the project and use the project library.
2: Do not activate the project and use the current library paths.
3: Cancel and resolve the situation another way.

Selection:
1
- renv activated -- please restart the R session.
The following package(s) will be updated:

# CRAN -----------------------------------------------------------------------
- bslib       [0.7.0 -> 0.4.0]
- cachem      [1.1.0 -> 1.0.6]
- cli         [3.6.3 -> 3.6.1]
- ...
We need to use renv::status() to assess that we have
completed this stage. We can expect output messages about a different R
version generating the lockfile.
R
renv::status()
OUTPUT
The lockfile was generated with R 4.2.1, but you're using R 4.4.2.

See ?renv::status() for advice on resolving these issues.
To confirm specific package versions in the R console, compare the
registry in the lockfile (renv.lock) with the output of the
function packageVersion("package_name").
Reproducible research features
We defined Reproducible research as a practice that wants to ensure that anyone with access to data inputs and software can feasibly generate the outputs to check or build on them.
A key feature of this practice is the combination of
renv with the
make.R file. With this file, and any other
more sophisticated alternatives like GNU Make or
targets, we are sure that we:
- Can feasibly regenerate the outputs.
- Can inform about the reliability of the project.
- Have an isolated time-proof capsule of dependencies.
Key Points
A dependency is a package that your project needs to run.
Use the
DESCRIPTIONfile to register your project dependencies.Use renv to isolate and create package-specific reproducible environments for your dependencies.
Use the folder template to differentiate your
raw-data/andderived-data/.Save analysis and generated files in isolated folders like
analyses/,figures/, andoutputs/.Use the
make.Rto list your analysis scripts and facilitate the regeneration of all your outputs.Reproducible environments and Make files are features related to Reproducible research.
Content from README files
Last updated on 2026-03-31 | Edit this page
Overview
Questions
- Where can I give proper installation instructions?
- What licenses can I add for text, figures, and data?
- How do I generate a citation for my project?
- How can I increase the visibility of community guidelines?
Objectives
- Recognise good practices for
READMEfiles. - Complement the rcompendium
READMEtemplate. - Identify your project features related to Open science.
README files
README files can include a whole range of information
from an overview of the project, installation
instructions and licensing details to information on how to
contribute to the code and cite the software. With modern text markup
and formatting through Markdown, README files
can also be rendered in a much more accessible and
appealing manner than traditional plain-text
README files. (Cohen
and Crouch, 2023)
Good practices
There is no standard for README files, but we can use
some widely used approaches. Here we list some README good
practices collected by Cohen
and Crouch, 2023:
- Consider a formatting, layout, or structure.
- Ensure clear and concise descriptions.
- Avoid overloading the
READMEwith content that could be hosted elsewhere. - Consider including a table of contents if you have many sections.
-
Know your audience - Is your
READMEaimed at other developers or end-users of your software/code?
Structure
Using an online editor called readme.so, we selected some typical sections frequently found in R packages:
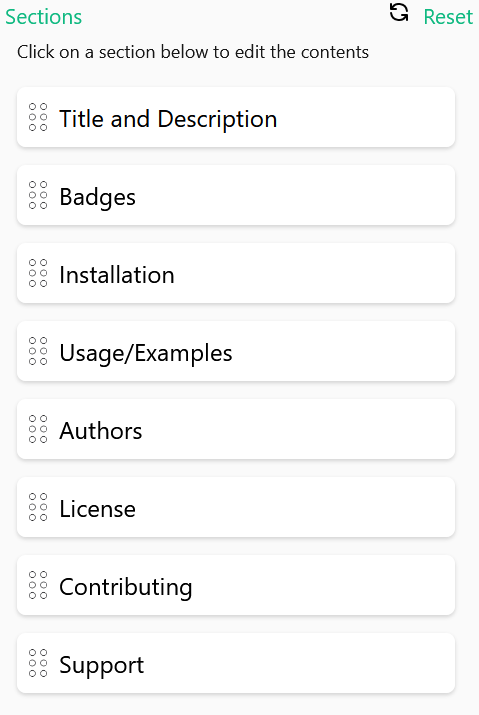
This selection generates this README file preview
template:
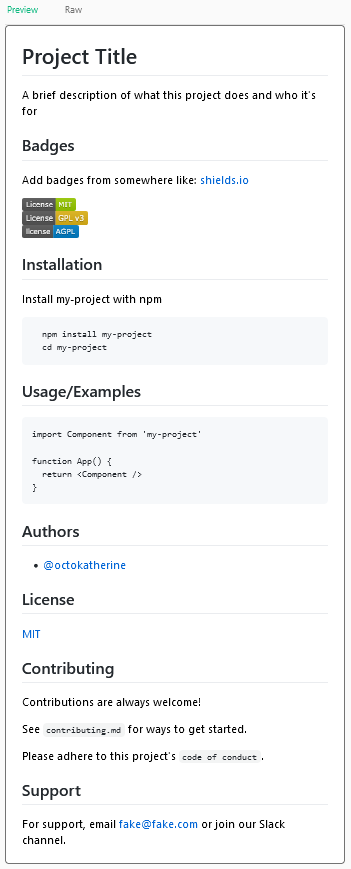
We can find room for improvement if we compare this readme.so template with the
README file from the rcompendium
template.
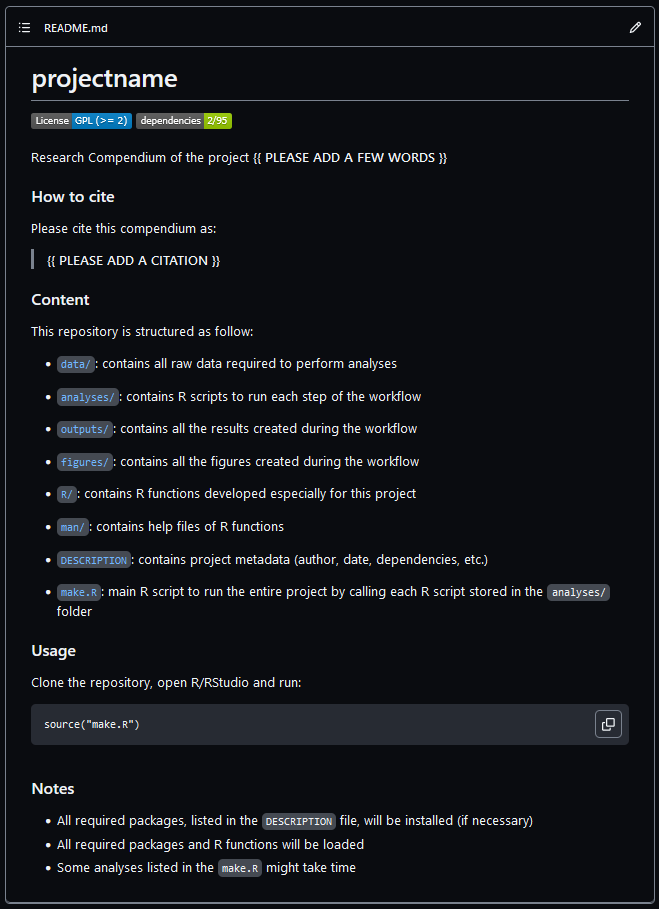
In this episode, we will complement this template with some key sections.
Callout
We invite you to edit your README as you prefer! You can
also use this simple readme.so editor to
generate more section templates than the ones we will cover
here.
Let’s code
First, let’s Knit the README.Rmd.
We must remember that our README.md is generated from
the README.Rmd file. So we need to edit that file and
Knit it after any update. This step is not done
automatically for this template.
Installation
The Usage section includes the installation steps
of:
- Clone a repository, and
- Use R/Rstudio.
We can assess our target audience and adapt this content to our projects.
Let’s assume that the following personas are examples of the types of people that are your target audience:
Patricia is a PhD student. She uses R to analyse infectious disease data and wants it to be reproducible. She is unfamiliar with GitHub and the terminal window.
Lucia is a Field epidemiologist. She uses R to clean data and create plots for outbreak response. She wants to communicate her doubts and ideas with package maintainers. She does not track the versions of her code with Git.
If we want to add external guides to facilitate the
git clone step, we can complement our installation steps
with external resources.
Copy, edit as you prefer, and paste it to your README
file:
### Usage

First, clone this repository. You can follow [steps on creating a new Rstudio Project from a GitHub repository](https://www.epirhandbook.com/en/version-control-and-collaboration-with-git-and-github.html?q=clone#clone-from-a-github-repository).

Then, run:
Checkpoint
Knit the README.Rmd file.
Callout
Notes are not part of the structure but information
about the Usage step. We can add one more # to
its heading.
Citation
We can take advantage of the DESCRIPTION file to
generate a CITATION file.
First, open the DESCRIPTION file.
Note that in the 5th line, the Authors@R section is
already filled with your details. You set this up when running the
Configuration steps with
rcompendium::set_credentials().
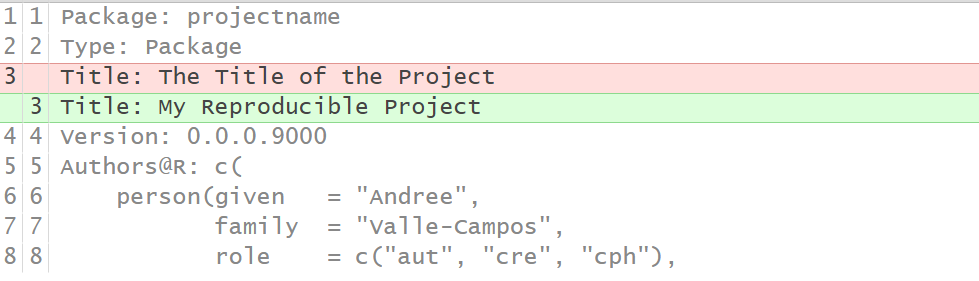
Second, write a Title for the Project in the 3rd line.
The Title
should be written in sentence case, not ending in a full stop.
Callout
CITATION.cff
is file format that facilitates software citation in ecosystems like
GitHub, Zenodo and Zotero.
Third, to generate a CITATION.cff file from the DESCRIPTION file, we can install the cffr package:
R
install.packages("cffr")
Fourth, create a .cff file:
R
cffr::cff_write(dependencies = FALSE)
Commit and Push your changes. Identify that GitHub has built-in support for this citation.
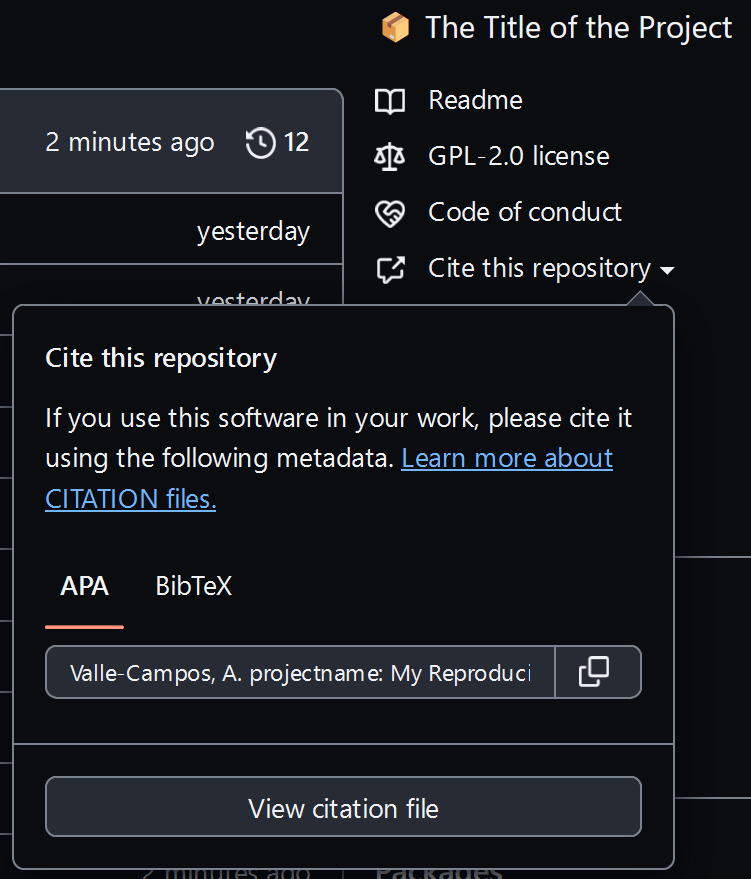
How can I paste the CITATION in the README file?
First, open the CITATION.cff file:
R
usethis::edit_file(path = "CITATION.cff")
Our default CITATION.cff does not record the
year of creation. To solve it, we can add this extra line
at the end:
date-released: '2023-04-23'Second, to read the CITATION.cff in the
README.Rmd, as in this
other tutorial README file:
- Paste this template text in the
README.Rmdat the Citation section
See [CITATION.cff](CITATION.cff) for citation information,
including a list of authors.
([Read more about the Citation File Format and how to use it](https://citation-file-format.github.io/).)

To cite these tutorials in publications use:- Add this chunk using following chunk options
eval=TRUE, echo=FALSE, comment="":
R
cffr::as_bibentry(x = "CITATION.cff")
- To include a BibTeX entry for LaTeX users, paste this chunk with
options
eval=TRUE, echo=FALSE, comment="":
R
utils::toBibtex(cffr::as_bibentry(x = "CITATION.cff"))
Lastly, Knit the README.Rmd file. If you
get an error, try installing
the latest version of {evaluate} R package.
Licenses
Our project has a GPLv2
license registered in the LICENSE.md file and in the
DESCRIPTION file as a GPL
(>=2).
We adapted text generated by the {rrtools}
package template.
Copy, edit as you prefer, and paste it to your README
file:
### Licenses
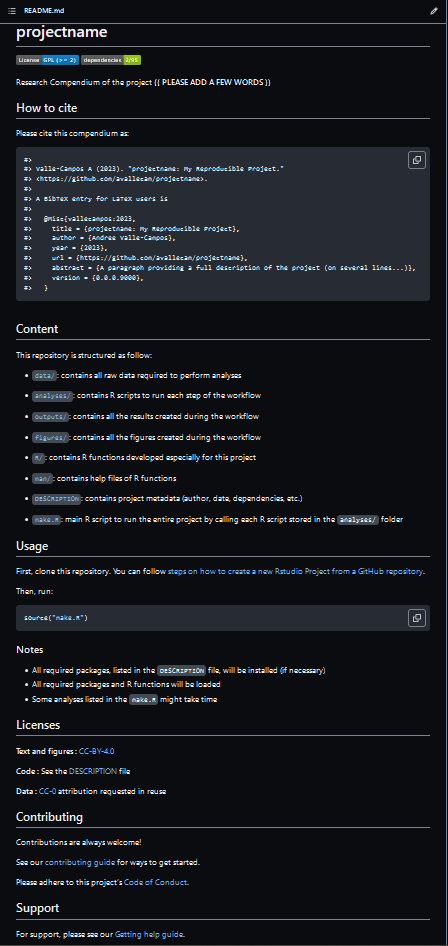
**Text and figures :** [CC-BY-4.0](http://creativecommons.org/licenses/by/4.0/)
**Code :** See the [DESCRIPTION](DESCRIPTION) file
**Data :** [CC-0](http://creativecommons.org/publicdomain/zero/1.0/) attribution requested in reuseCheckpoint
Knit the README.Rmd file.
Contributing
We adapted this format from the template generated from readme.so. We added hyperlinks to redirect
to the Community files in the .github/ folder.
Copy, edit as you prefer, and paste it to your README
file:
### Contributing

Contributions are always welcome!

See our [Contributing guide](/.github/CONTRIBUTING.md) for ways to get started.

Please adhere to this project's [Code of Conduct](/.github/CODE_OF_CONDUCT.md).

### Support

Please see our [Getting help guide](/.github/SUPPORT.md) for support.
Checkpoint
Knit the README.Rmd file.
Markdown
In Markdown, the Header 2 generates an underline that
can help isolate sections of our chosen structure.
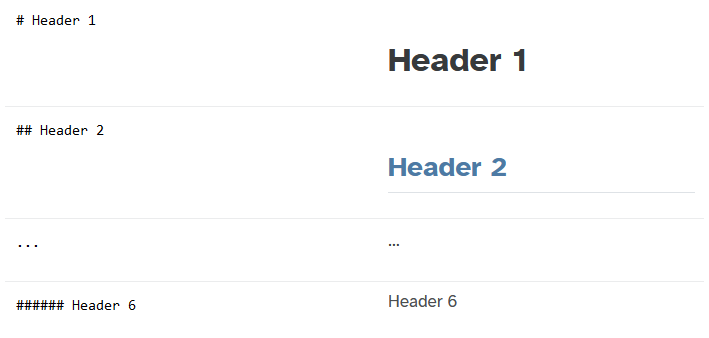
Remove one # from all the main headers. This edit
generates a final README file that looks like this:
Discussion
Consider your research project:
- Would you add or remove any section from the
READMEtemplate above? Why?
Explore the online editor called readme.so to identify more sections that could suit your research project.
Testimonial
We recommend you to listen to the Code for Thought podcast episode on the
READMEfile. They also have a few links that you might find helpful.For Badges, we recommend reading a Blog post on Communicating development stages of open-source software at the Epiverse-TRACE website.
Checklist
Open science features
We define Open science as making software, data inputs and outputs freely available by publishing all of them with open licences to facilitate project reuse.
A vital feature of this practice is the Licenses. Explicit licenses that include the software and the specific license for text and figures and data, in particular, are also relevant.
Key Points
- Complement the
READMEtemplate with Installation steps, Citations, Licenses and Contributing guides. - Use different types of licenses of text and figures, software code, and data.
- Licenses is a feature related to Open Science.
Content from Wrap up
Last updated on 2026-03-31 | Edit this page
Overview
Questions
- Where is a full view of the concepts covered today?
- How can I self-assess my progress using these tools?
- Where can I ask for questions after this workshop?
- Where can I write my feedback on this workshop?
Objectives
- Show the final concept map of the workshop.
- Share a self-assessment review checklist.
- Remind our communication forum.
- Share the feedback form of the workshop.
The goal
Self-assessment template
Now, we invite you to self-assess your progress in these good practices using a review checklists similar the one used by JOSS, the Journal of Open Source Software.
Callout
We related these two references in one Google sheet. Take a look!
Write an individual learning reflection
Before we wrap up, please take 5 minutes to think over everything we have covered so far.
- On a piece of paper, write down something that captures what you want to remember about the day.
- The Instructor will not look at this - it is just for you.
If you do not know where to start, consider the following list for a starting point:
- Draw a concept map, connecting the material
- Draw pictures or a comic depicting one of the day’s concepts
- Write an outline of the topics we covered
- Write a paragraph or “journal” entry about your experience of the workshop today
- Write down one thing that struck you the most
This exercise should take about 5 minutes.
Our communication channel
Checklist
We remind you of our communication forum called GitHub Discussions. Here we will ask and solve our and your question on the topic!
You can fill your questions under the Q&A category… at any time in the future!
Your constructive feedback
Please take 5 minutes to fill out the feedback form shared by the instructor. Your comments will be beneficial for further improvements to our workshop.
Key Points
- Use the JOSS review checklist to self-assess your progress.
- Use the
GitHub Discussionsas our communication forum after the workshop. - Use the feedback form to share your constructive comments.
Content from Appendix
Last updated on 2026-03-31 | Edit this page
Overview
Questions
- Where can I add my functions?
- How do I need to document my functions?
- How can I read the documentation of my functions?
- How can I write a manuscript with my project outputs?
Objectives
- Write your functions documentation following the rcompendium template.
- Load your functions and update its documentation using devtools.
- Create a website for the project using usethis.
- Create a manuscript template with
{rrtools}.
What about my functions?
How do I write my functions documentation?
We must write our custom functions as Modular
functions and save them in the R/ folder. You can
write the documentation of your functions following a
standard documentation method.
The rcompendium template already contains a
fun-demo.R for this.
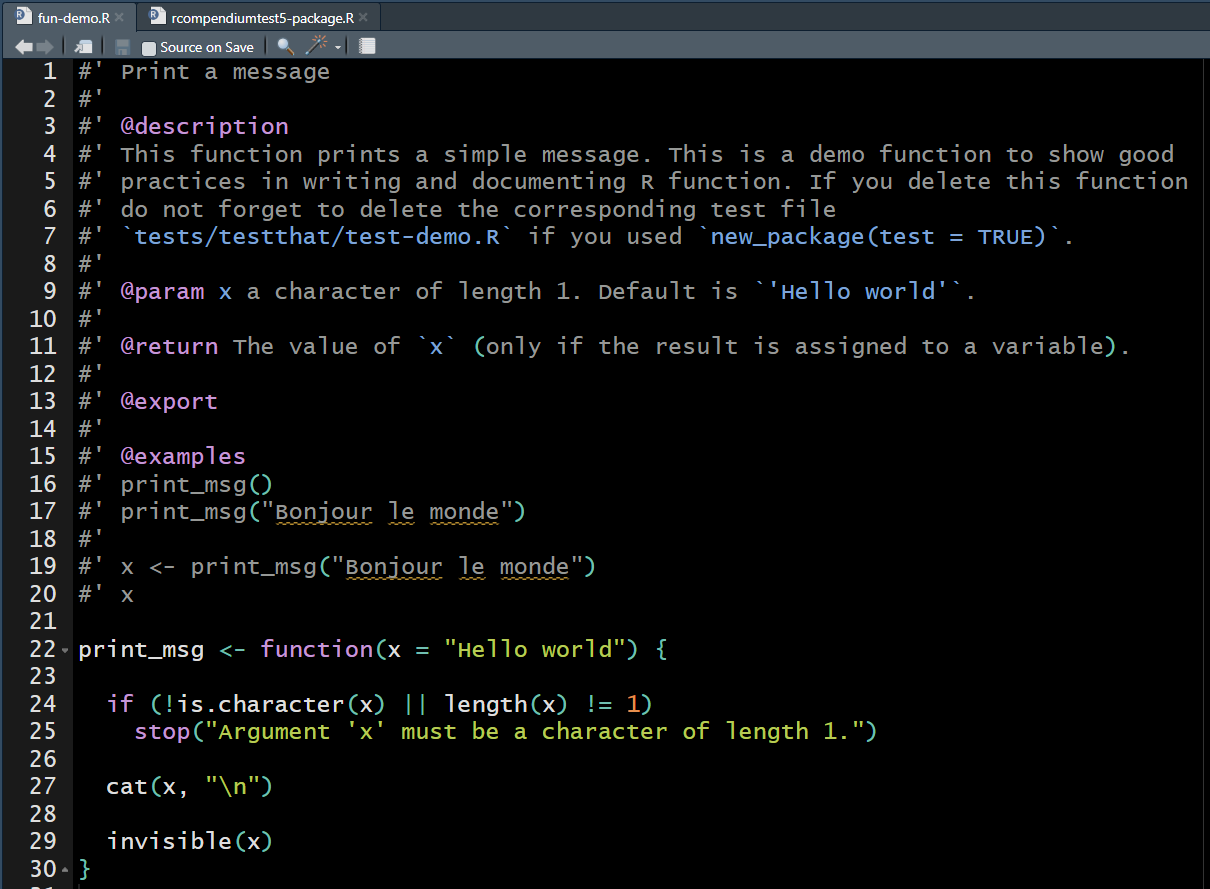
Callout
Remember that documented functions can facilitate further efforts to reuse them and create a specific R package!
How do I load my functions?
To load your project functions, as written in
line 20 of the make.R file, run:
R
devtools::load_all(here::here())
How do I read my functions documentation?
Is there an easier way to read the documentation of my modular functions?
Remember that after you write the documentation of new functions on
the R/ folder, you must update your function and project
documentation files, which are in different files and folders.
To do this run:
R
devtools::document()
This last step will update the following:
-
man/folder, which stores the project documentation, and - the
NAMESPACE, that registers the functions that your project exports for your data analysis to run.
Lastly, you can ask with ?function in the
Console and read the documentation for your functions, as
any other function from the packages you installed. Try to run this:
R
?print_msg
Create a project website
An alternative way to navigate all the files generated by the rcompendium template is with a website.
We can create a website using GitHub pages. To make this possible run:
R
usethis::use_pkgdown_github_pages()
This function implements the GitHub setup needed to automatically
publish your site to GitHub pages using the {pkgdown}
package.
This output is possible in two steps:
- First, it prepares to publish the pkgdown site from a new
gh-pagesbranch. - Then, it configures a GitHub Action to automatically build the site and deploy it via GitHub Pages.
Lastly, the pkgdown site’s URL is added to the
pkgdown configuration file, to the URL field of
DESCRIPTION, and to the GitHub repo.
Commit and Push your changes.
Callout
Remember that when using GitHub Actions, next to the
SHA/hash will be the status icon of the
actions.
- Yellow ball for “Job running”,
- Red cross for “Failed Run”, and
- Green check for “job done!”.
Please wait for it to get green and inspect the Reference tab on the navigation bar.
Now, let’s compare the fun-demo.R file, the
?print_msg output, and the website format:
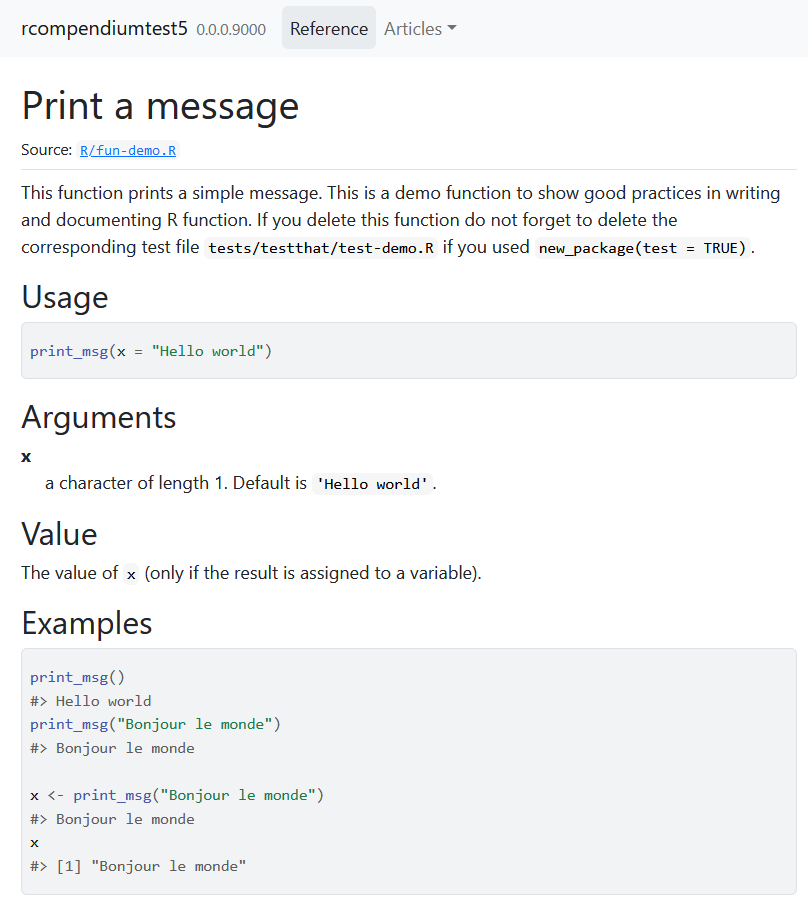
Callout
A pkgdown website format can facilitate the navigation
through:
- Community files and
- Function documentation.
How do I write a manuscript for my project?
You can use handy functions from another research compendium package
called {rrtools}.
To get a template of files required to fill a manuscript run:
R
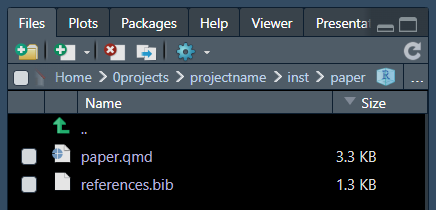
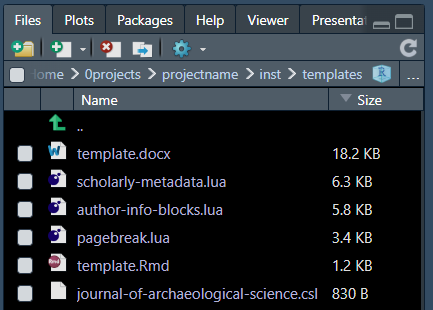
rrtools::use_analysis(location = "inst", data_in_git = FALSE)
This function will create a folder inst/ with a new set
of folders for data and figures. You can avoid using them and only use
the .qmd as a template for your manuscript.
The .qmd files get formatted from several template files
like references using .bib and citation style using
.csl.
Using rrtools::use_analysis() with those arguments will
not modify your rcompendium configuration. Other
functions can change it.
Reproducible research features
We also relate Reproducibility with the practice of describing and documenting the research process so that another researcher can re-run the software on the same data input to get the same data outputs.
Features related to this are:
Documentation strings in one or two lines using active verbs to describe how inputs turn into outputs (Irving et al. 2021). The documentation of functions, like the
fun-demo.Rtemplate file, follows this good practice.Manuscripts using literate programming with tools like Rmarkdown or Quarto. The template provided by
{rrtools}facilitates files to start with this practice.
Callout
Remember that if you have all your changes as commits with git, you
can revert any modification with the button
Revert, located between the
Stage and Ignore buttons.

Key Points
- Write your functions documentation following the
R/fun-demo.Rtemplate. - Run your project functions with
devtools::load_all(). - Update your functions documentation with
devtools::document(). - Read your functions documentation with the
?functionnotation in the R console. - Create a website for the project with
usethis::use_pkgdown_github_pages(). - Use a manuscript template with
rrtools::use_analysis(location = "inst", data_in_git = FALSE). - Documentation strings and Manuscripts using literate programming are features related to Reproducible research.
Content from Definitions
Last updated on 2026-03-31 | Edit this page
Overview
Questions
- How can I define Reliability, Usability and Sustainability?
Objectives
Define the concepts of Open science, Reproducible research, and Sustainable software.
Define related concepts like Reliability and Usability.
Define related features for each concept.
Introduction
Three introductory concepts informed our approach to this material.
Open science
Definition:
Make data inputs, software, and data outputs freely available by publishing all of them with open licences (Irving et al. 2021), to facilitate project reuse.
Also make their dissemination available to any member of an inquiring society, from professionals to citizens (ORION Open Science, 2020), to improve its transparency and public ownership.
Related feature:
Open Licence: An open licence that permits reuse using MIT or GPL for software (Choose a License, 2023) and CC BY or CC0 for data, prose and other creative products (Creative Commons, 2023, Irving et al. 2021).
DEI: Diversity, Equity, and Inclusion. There are four CHAOSS’s metrics for projects: Project Access, Communication Transparency, Newcomer Experience, Inclusive Leadership. (The GitHub Blog, 2023)
Reproducible research
Definition:
Ensure that anyone with access to data inputs and software can feasibly generate the data outputs, both to check or build on them. (Irving et al. 2021)
Practice of describing and documenting the research process in such a way that another researcher can re-run the software on the same data input to get the same data outputs.
Related features:
Documentation strings: in one or two lines using active verbs to describe how inputs turn into outputs (Irving et al. 2021).
Literate programming is the practice of mixing code and descriptive writing in order to execute and explain a data analysis simultaneously in the same document (Eli Lilly and Company, 2022).
Software descriptions structured in four types with complementing purposes: tutorials, how-to guides, technical references, and explanations. (Documentation System, 2023).
Related concepts:
Reliability: Result consistency across many repetitions of the same experiment. (Dymocks Tutoring, 2022)
Usability: Capacity to provide conditions to perform the tasks safely, effectively, and efficiently. (Wikipedia, 2023)
Sustainable software
Definition:
- The ease with which to maintain and extend rather than replace. (Irving et al. 2021) It depends on the quality of the software, the skills of the potential maintainers, and if users can afford to keep up to date (how much the community is willing to invest).
Related features:
Modular code: Build programs out of short, single-purpose functions with clearly-defined inputs and outputs (Wilson et al, 2017)
Unit testing: Small test of one particular feature of a piece of software. (Wilson et al, 2017)
Version control: Keeping track of changes that you or your collaborators make to data and software. (Wilson et al, 2017)
Community around software: Users and collaborators that can communicate effectively with maintainers given the software documentation and by public or private platforms like chat channels, video conferencing, and more. (Wilson et al, 2017)
How to use these concepts?
Often used interchangeably but use them differently can help to differentiate the characteristics of a project (Irving et al. 2021):
We can have open science projects without documentation, thus not reproducible.
We can have an automated and documented project not open to the public, thus not open science.
We can have open and reproducible software but lack incentives for maintainers, thus not sustainable.
Key Points
The definitions of Open science, Reproducible research, and Sustainable software help us identify their specific software features.
Differentiating these concepts helps us to differentiate the characteristics of a project.